
The reverse outline method is a powerful strategy for revising a manuscript. It allows writers to break down their story into its core components after the first draft is complete, offering a clearer picture of how the structure and flow of the story actually work, rather than how you intended it to work. Here’s a detailed look at how to use the reverse outline method:
What is a Reverse Outline?
Unlike a traditional outline, which you create before writing, a reverse outline is created after your first draft is finished. It involves going through your manuscript and summarizing each chapter, scene, or section to analyze its function, structure, and coherence.
The goal is to understand what’s actually on the page, not what you think is there. This method helps identify plot holes, unnecessary scenes, structural weaknesses, and inconsistencies in pacing or character development.
How to Use the Reverse Outline Method
1. Break Down Your Manuscript by Chapter or Scene
- Why it works: This allows you to see how each part of your story contributes to the whole. By summarizing each chapter or scene, you gain clarity on the purpose and impact of each section.
- How to apply: Read through your manuscript and, for each chapter or scene, create a brief summary. This summary should be factual and concise, listing the key events, character actions, and any major conflicts or turning points.
Example: For each chapter, note:
- What happens in the scene? (Plot)
- How does this scene move the story forward? (Purpose)
- What character(s) change in this scene, and how? (Character development)
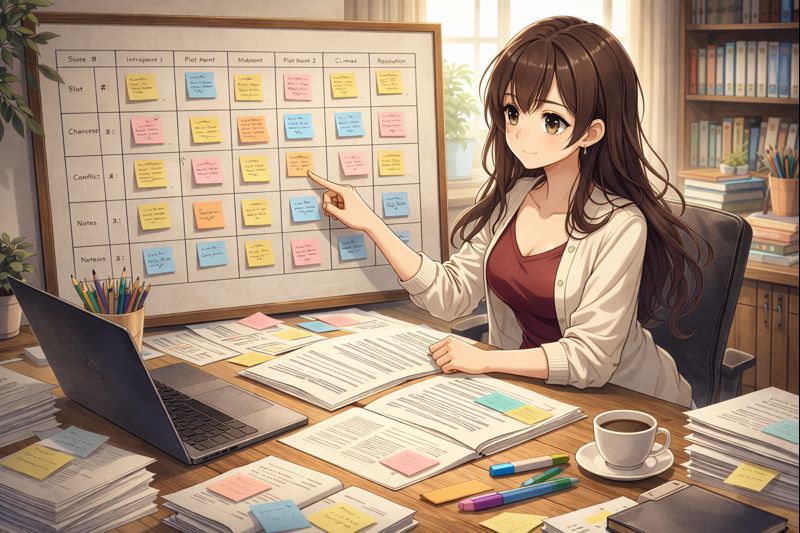
You can create a table or list to organize your summaries. For example:
| Chapter/Scene | Summary | Purpose | Character Development | Notes |
|---|---|---|---|---|
| 1 | Protagonist meets antagonist at the market | Introduce conflict between main characters | Protagonist’s fear of confrontation shown | Pacing feels too slow |
| 2 | Protagonist finds mysterious map | Set up the main quest | Protagonist’s curiosity highlighted | Some of the scenes here could be cut and merged with Ch. 3 |
2. Identify the Function of Each Scene
- Why it works: Not all scenes are created equal, and some may serve multiple functions, while others may serve none. Identifying the role of each scene helps determine whether it’s necessary, needs reworking, or should be cut.
- How to apply: Once you have summarized each scene or chapter, ask:
- Does this scene move the plot forward? Every scene should contribute to the overall story arc in some way. If a scene doesn’t introduce new information, advance the plot, or develop the characters, it may be unnecessary.
- Does this scene reveal something important about a character? If a scene doesn’t push your characters toward change or reveal something new about them, it may be too static.
- Is this scene repetitive? Watch out for scenes that cover the same ground as previous ones. Repetition can slow down the pacing and bore readers.
Example: A chapter in which the protagonist debates taking action might feel unnecessary if a similar scene already exists elsewhere in the manuscript.
3. Analyze the Pacing and Flow
- Why it works: A reverse outline lets you see how quickly or slowly your story is progressing. Are there long stretches without any major conflict or tension? Are certain events happening too quickly for emotional payoff?
- How to apply: Look for areas where pacing is uneven. Highlight sections where the story drags or where things move too fast for the reader to fully absorb the stakes.
- Fast pacing: Scenes might need more depth or detail to allow emotional moments to land.
- Slow pacing: Consider tightening by cutting unnecessary exposition, scenes, or filler dialogue.
Example: If multiple chapters involve back-to-back action without character reflection or emotional depth, readers might get fatigued and lose interest. On the flip side, long stretches of character introspection without plot progression can slow the momentum.
4. Track Character Arcs
- Why it works: A reverse outline helps ensure that character development is consistent throughout the manuscript and that characters experience meaningful growth.
- How to apply: For each scene, make a note of how the characters are changing. Are they growing, learning, or evolving in some way? Each major character should have an arc that ties into the main plot, so use the reverse outline to track if and when these changes happen.
Example: If your protagonist starts the story as naive but is supposed to gain wisdom, the reverse outline will help you see if their transformation occurs too quickly, too slowly, or not at all.
5. Check for Structural Gaps or Plot Holes
- Why it works: A reverse outline helps you spot where the plot is missing critical elements or where information is revealed too early or too late.
- How to apply: As you review your summaries, ask yourself if there are missing steps in the progression of the story. Does the protagonist suddenly gain knowledge they shouldn’t have? Are there leaps in logic or unexplained events?
Example: You might realize that the antagonist’s motivations are unclear or that a subplot is dropped halfway through without resolution.
6. Evaluate Theme and Subtext
- Why it works: Themes and subtext should be woven throughout the manuscript, and a reverse outline helps ensure they’re present consistently.
- How to apply: After outlining each scene, review the manuscript’s thematic elements. Ask yourself:
- Is the theme evident throughout the story?
- Are there any scenes that weaken the overall message?
- Does subtext support the characters’ development or plot without being too overt?
Example: If the theme is about overcoming fear, check that character decisions and plot events reflect this theme consistently.
7. Make Targeted Revisions
- Why it works: The reverse outline provides a roadmap for making revisions in a structured, purposeful way.
- How to apply: Once you’ve identified problematic areas in your manuscript, prioritize revisions based on importance. Start with the “big picture” elements (structure, plot, character development) before focusing on line edits or polishing prose.
Example: If the reverse outline reveals a sagging middle (common in novels), you might combine or cut scenes, increase stakes, or introduce a subplot to keep the story engaging.
Benefits of Using the Reverse Outline
- Objectivity: It helps you view your story more objectively since you’re summarizing what’s actually on the page, not what you think is there.
- Structural clarity: It brings your manuscript’s structure into focus, allowing you to see if the pacing and progression are working.
- Character consistency: It ensures that characters are developing naturally and that their actions align with their growth.
- Efficient revisions: It saves time by targeting the areas of your manuscript that need the most attention instead of blindly revising.
- Identifying gaps: It helps uncover plot holes, inconsistencies, or missing elements that might otherwise be overlooked.
Conclusion
The reverse outline method is an essential tool for any writer in the revision process. By breaking down your manuscript into its key components, you gain clarity on what’s working and what needs revision. It can help you ensure that your story has a strong structure, consistent character arcs, and the right pacing to keep readers engaged. Use it as a guide to help shape your final draft into a cohesive, compelling story.
Subscribe
Welcome to my digital commonplace book. Sign up below to receive articles on all the things I found interesting this week. (I usually write about writing, productivity, self-evolution, with a sprinkle of personal finance here and there.)


Leave a comment